
Liquid is Shopify’s templating language — the tool that connects your store’s data to your theme’s design. If you’ve ever opened your Shopify theme code and noticed curly braces like {{ }} or {% %}, you’ve already seen Liquid in action. It makes your storefront dynamic, so product pages, collections, and blogs update automatically without manually changing the code. For example, {{ shop.name }} shows your store’s name, and {{ product.title }} displays a product’s name wherever you put it.
Think of a Shopify theme as built with HTML, CSS, and JavaScript, but Liquid is the glue that pulls in live data:
- HTML provides the structure.
- CSS adds the style.
- JavaScript makes things interactive.
- Liquid fills in the real content from your store before the page reaches your customer.
Liquid has three main building blocks you’ll use again and again:
- Objects – pull in store data like products, collections, or customer info.
- Tags – add logic and control, like showing something only if a product is in stock.
- Filters – change how your data looks, for example formatting a price.
Understanding these basics lets you safely customize themes, make your store look professional, and start building the skills needed for advanced Shopify development.
In this guide, we’ll walk you through Liquid fundamentals using 7 practical tips for beginners. By the end, you’ll be able to read, write, and edit Shopify theme code with confidence — creating a dynamic, fully functional storefront tailored to your business.
Visual Overview of Shopify’s Layers
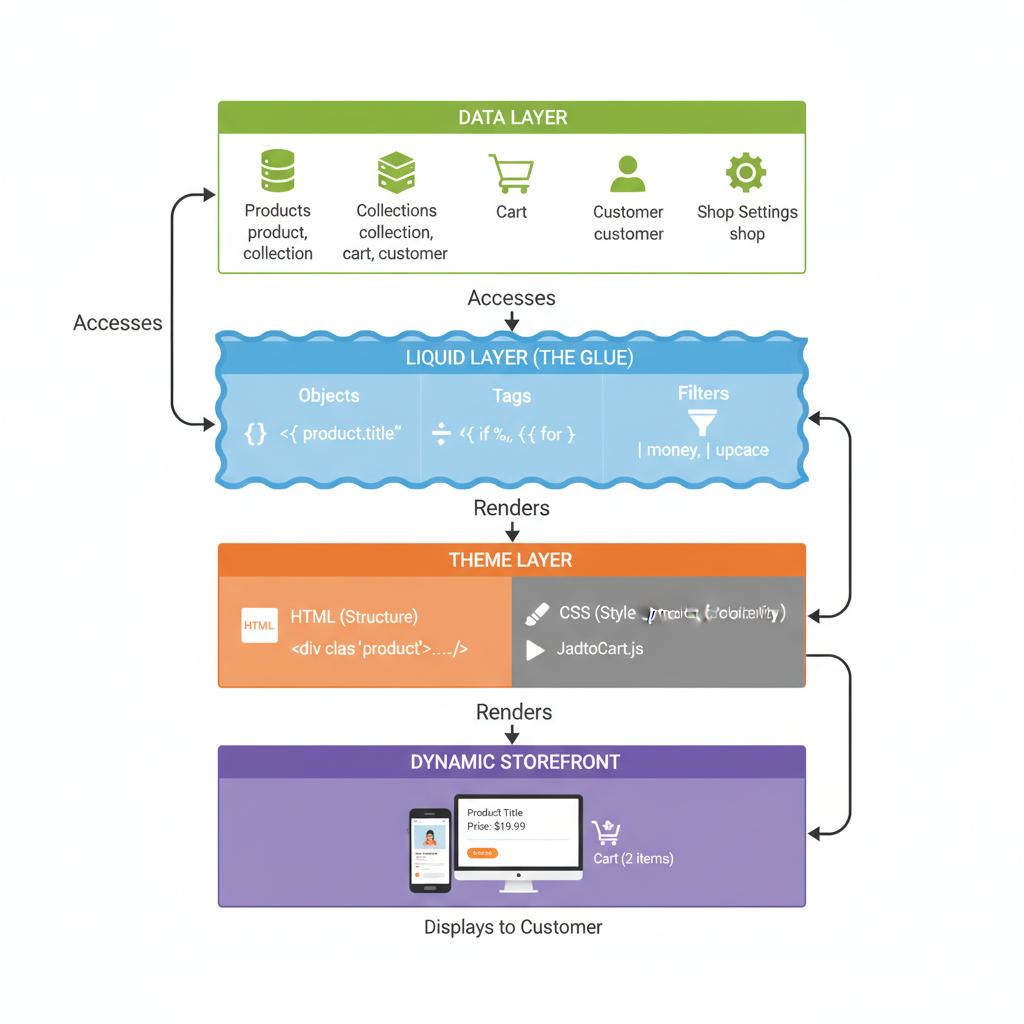
The chart shows how Shopify’s data flows from the Data Layer → through Liquid → into the Theme Layer → and finally to the Customer View. It’s a simple way to see why objects, tags, and filters are so essential.
Tip 1: Understand Liquid Objects
Why it matters: Objects let you pull live store data into your theme — without them, every page would be static.
What Are Liquid Objects?
In Shopify, Liquid objects are containers that hold store data. They let you pull information like products, collections, carts, customers, and shop settings directly into your theme. Objects are wrapped in double curly braces {{ }} so Liquid knows to replace them with real data when the page loads.
Think of objects as placeholders that automatically fill with the correct information from your Shopify store.
Common Liquid Objects Include:
product– access information about a specific productcart– details about the customer’s shopping cartshop– store-wide settings, like name or currencycollection– information about a product collectioncustomer– details about a logged-in customer
Example: Output a Product Title
<h2>{{ product.title }}</h2>
When the page renders, Shopify replaces {{ product.title }} with the actual title of the product.
Practical Use:
- Display product details automatically on collection pages
- Show cart totals in the header
- Pull shop name or contact info into multiple pages
For example, {{ cart.item_count }} can show the number of items in a customer’s cart anywhere on your site, updating in real-time.
Key Takeaways:
Using them correctly saves time, prevents errors, and improves user experience.
Objects are the building blocks for dynamic content in Shopify.
They allow themes to automatically display store data.
Tip 2: Master Liquid Tags
Why it matters: Tags add logic and control to your theme. They let you loop through products, show content conditionally, and reuse code efficiently.
Liquid tags control logic and flow inside your theme. Unlike objects (which output data), tags tell Shopify what to do — such as looping through products, adding conditions, or including snippets.
Common Liquid Tags:
{% if %}→ conditional logic{% for %}→ loop through items (like products in a collection){% assign %}→ create variables for reuse{% include %}or{% render %}→ bring in snippets or reusable code
Note: Shopify has deprecated {% include %} in favor of {% render %}. Always use {% render %} in new projects.
Example: Loop Through a Collection
{% for product in collection.products %}
  <h2>{{ product.title }}</h2>
{% endfor %}
Practical Use:
Tags make your theme flexible. You can:
Reuse small snippets of code across multiple templates
Show sale banners only if a product is discounted
Loop through multiple products without hardcoding them
Tip 3: Use Filters to Transform Output
Why it matters: Filters let you format and modify how data appears on your storefront — like displaying prices correctly or shortening long text — without changing the underlying data.
Filters are little tools that change the way your data looks when it shows up on the page. They don’t change the data itself — they just transform how it’s displayed.
Common Liquid Filters You’ll Use Every Day
Text Filters
upcase→ turns text into uppercase.
{{ "headphones" | upcase }} → HEADPHONES
downcase→ turns text into lowercase.
{{ "HELLO" | downcase }} → hello
capitalize→ capitalizes the first letter of a word.
{{ "audiophile store" | capitalize }} → Audiophile store
truncate→ shortens text by characters.
{{ “This is a long description” | truncate: 10 }} → This is…
truncatewords→ shortens text by words.
{{ "Shop our collection of premium headphones" | truncatewords: 3 }} → Shop our collection...
strip_html→ removes HTML tags (perfect for blog previews).
{{ "<p>Hello <strong>world</strong></p>" | strip_html }} → Hello world
Replace Filter
replace→ swaps one word for another.
{{ "Welcome to my shop" | replace: "shop", "store" }} → Welcome to my store
Formatting Filters
money→ formats numbers into your store’s currency.
{{ 1499 | money }} → $14.99
date→ formats dates.
{{ article.published_at | date: "%B %d, %Y" }} → August 27, 2025
Pro Tip: Start by practicing with money, date, and text filters (upcase, truncate, replace). These cover 80% of what you’ll use filters for in real projects.
Tip 4: Master Loops for Dynamic Content
Why it matters: Loops let you repeat blocks of code for each item in a list — like products in a collection or articles in a blog. Instead of hardcoding multiple items, loops dynamically generate them, making your theme scalable and easy to maintain.
Example:
<ul>
  {% for product in collection.products %}
    <li>{{ product.title }} – {{ product.price | money }}</li>
  {% endfor %}
</ul>
This will automatically list every product in the current collection with its name and formatted price.
Other useful loop helpers:
forloop.index→ Shows the current loop number (1, 2, 3…)limit→ Restrict the number of items.offset→ Skip items at the start.break/continue→ Control the loop’s flow.
Pro Tip: Combine limit and offset to create pagination — keeping pages fast and user-friendly.
Tip 5: Use Conditionals to Control What Shows
Why it matters: Conditionals (if, elsif, else) let you show or hide content based on rules. This makes your store dynamic and tailored — for example, only showing a sale badge when a product is discounted.
Example:
{% if product.compare_at_price > product.price %}
  <span class="badge">On Sale!</span>
{% else %}
  <span class="badge">Regular Price</span>
{% endif %}
Other conditional tools:
unless→ The opposite ofif.and/or→ Combine multiple conditions.contains→ Check if text or lists include a value.
Pro Tip: Combine conditionals with loops to add rules, like showing “Sold Out” on a product card only if product.available is false.
Tip 6: Reuse Code with Snippets
Why it matters: Snippets let you keep your code clean and avoid repeating yourself. Instead of writing the same “product card” code in multiple places, write it once as a snippet and include it wherever needed.
Example:
Create a file in your theme under /snippets/product-card.liquid:
<div class="product-card">
  <h2>{{ product.title }}</h2>
  <p>{{ product.price | money }}</p>
</div>
Then include it on a page with:
{% render 'product-card', product: product %}
Pro Tip: Pass variables into snippets when you need flexibility. For example, you could reuse the same product card layout but show different button text by passing in a button_label variable.
Tip 7: Build Flexible Layouts with Sections
Why it matters: Sections let you create reusable, customizable parts of your theme. Merchants can edit sections directly in the Shopify customizer — no code required.
Example:
Create a new section file /sections/hero.liquid:
{% schema %}
{
  "name": "Hero Banner",
  "settings": [
    {
      "type": "text",
      "id": "heading",
      "label": "Heading",
      "default": "Welcome to Our Store"
    }
  ]
}
{% endschema %}

<div class="hero">
  <h1>{{ section.settings.heading }}</h1>
</div>
This creates a hero banner where the heading can be changed from the theme editor.
Pro Tip: Keep your section schemas simple at first. Start with just text or image settings—then gradually add more options (like colors, buttons, or toggles) as you grow more comfortable.
Conclusion
Mastering Liquid is the first step toward becoming a confident Shopify theme developer. By understanding objects, tags, and filters, and learning how to reuse code with snippets and build flexible layouts with sections, you can create a dynamic, professional storefront that updates automatically as your products and collections change.
If you want to dive deeper, check out these helpful resources:
- Shopify Liquid Cheat Sheet – An interactive reference for Liquid objects, tags, and filters
- Shopify Liquid Basics – A beginner-friendly guide covering the essentials of Liquid syntax and usage.
- Shopify Liquid Objects: Current Tags – Detailed documentation on the current tags available in Shopify Liquid
Ready to take your theme development skills further? In our next blog, we’ll explore Shopify Templates, Sections, Blocks, and Schemas — showing you how to structure your theme for maximum flexibility and customization. You’ll learn how to let merchants edit sections directly from the Shopify customizer and make your themes truly dynamic.
By following these tips and practicing regularly, you’ll gain the confidence to edit any Shopify theme safely and start building your own professional storefronts from scratch.